VMT™ ClearSpace 3D
Reliable foreign object detection in automated assembly processes
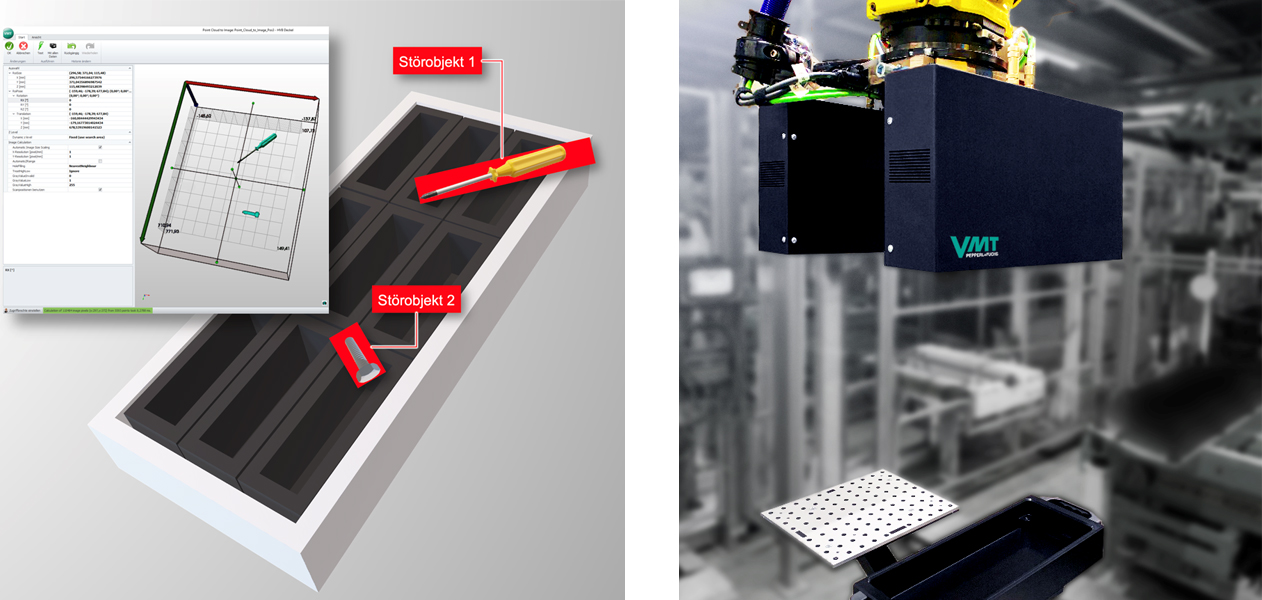
Unwanted foreign objects in automated industrial assembly processes can lead to damage to workpieces, grippers, or tools, and in the worst case, cause an undesired production stoppage in continuous flow manufacturing. To reliably detect these risks and allow intervention, the vision solution VMT™ ClearSpace 3D was developed, which can even detect objects as small as a few millimeters. The performance of the 3D sensor is crucial for the success of the measurement.

Object Acquisition via Stereo Vision
For an assembly process where cubic objects are placed into protective housings by robots, VMT™ has developed a solution concept based on two VMT™ DeepScan stereo vision sensors with an integrated projector unit. This system enables the fast and highly accurate 3D scanning of static scenes. The sensor unit moves linearly in the Y-axis over the object to be assembled, capturing its surface at three measuring points. This scanning process mathematically generates a 3D point cloud with up to three million data points. At the same time, the stereo sensors provide enough energy to gather sufficient reflections from the object’s surface, compensating for ambient light influences and ensuring high imaging quality and measurement accuracy.
Reference Plane as the Benchmark
Based on the 3D distance values measured, the VMT™ MSS (MultiSensorSystem) evaluation software first calculates a 3D model of the object's surface as a base plane and then creates a virtual reference plane as an "I.O." point cloud, initially for larger objects. In the next step, MSS compares the target point cloud and its I.O. values with the measured actual point cloud. Surface objects with an edge length of at least ten millimeters that intrude into the reference plane and have a certain surface area are detected as foreign objects, triggering the automatic halt of the assembly process. In the second evaluation stage, the edge lengths - and thus the threshold height for detection - are halved. Simultaneously, the point cloud is converted into a height profile, allowing finer elements to be reliably detected. In both evaluation stages, the detected objects are visualized on the MSS software platform as well as on the machine’s operator terminal.
Features
- Complete, three-dimensional inspection of parts for interference contours or foreign objects.
- Structured light allows for assembly at a fixed position. Alternatively, the sensors can be mounted on a gantry axis or industrial robot. Larger surfaces can be captured while maintaining the same level of detail.
- Resistant to changes in color and contrast, various surfaces, and reflections.
- Flexible measuring distances and adaptation to part geometry through the selection of appropriate sensors.
- Two measurement units with integrated lighting for optimal surface scanning.
- Fast evaluation using the VMT™ software platform.
- Two-stage evaluation process for reliably detecting foreign objects as small as a few millimeters.
- Visualization of detected foreign objects.
- Turnkey system solution, including sensors, MSS software, industrial PC, power and signal cabling, and numerous standard interface options for controllers and robots.

